In my previous post on homestead hot water, homestead-hot-water-part-1/ I discussed the hot water set up we had at the Maine homestead, the most basic system possible. For 20 years, we lugged buckets of water in by hand from a hand pump outside, poured the water into pots, set the pots on one of our wood stoves to heat and then we carried the hot water to the tub, sink or washer. This was great for building muscle and character. But yikes, there had to be a better way! And there is. A thermosiphon loop!
Our Canadian homestead has a piston pump and draws from a hand dug well. You can read about it here. homestead water supply That pump/pressure tank combination supplies pressurized water to the house. A wood cook stove in the kitchen set up with a thermosiphon loop and a storage tank provide our off-grid homestead’s hot water.
A Thermosiphon Loop
Don’t let the fancy term “thermosiphon loop” intimidate you. It’s a simple concept. Just as hot air rises, hot water does as well. A couple of paragraphs from my book “Off-Grid and Free- My Path to the Wilderness” explain the concept pretty well.
“We have a standard home water heater set up next to our stove. It’s roughly a 50-gallon tank. And that’s all it’s being used for, purely a storage tank. No electricity goes to this heater. We set up plumbing from the tank to the stove’s water jacket to take advantage of the flow of heated water. Just as hot air rises, the same principal applies to hot water. As water is heated in the jacket, it starts to flow upward and into the top of the water tank and is then replaced by colder water coming out of the bottom of the tank.”
“This is a simple and efficient method of taking some of the heat from the wood stove and using it to raise the temperature of water for household use. It works great, and it’s free. There is no need for any in-line pump since the water circulates on its own. The size of the tank is balanced with the size of the stove so we don’t end up with a tank of boiling water, which would happen if we had a much smaller tank. But the water does get hot. Since this is a standard insulated water tank, the water stays hot for days even if we have no fire in the stove. A pressure relief valve, standard in all homes, is a must for our system as well.”
There are many ways to plumb thermosiphon loop systems using copper tubing in fireboxes, around chimney pipes or on the exterior of a wood stove. If you understand the basic concepts, you should be able to utilize a wood stove to either fully heat or pre-heat water for your homestead.
We purchased a modern wood cook stove complete with a stove “jacket” which is simply a small tank that fits in the firebox. The jacket comes with two threaded ports to which piping can be run.
Hot Water Tank or Range Boiler
Although we chose a standard hot water heater as our storage tank, there are tanks made just for this purpose. Here is an example. http://www.vaughncorp.com/products/range-boiler/#dimensions
Because both our water tank and stove jacket have ¾ “ pipe threads, I chose to use ¾ “ galvanized pipe for all of my connections. That would be the minimum pipe diameter I would ever use in a system. The range boiler as shown has 1” pipe hookups which is even better. The bigger the pipe, the less restriction which allows for easier water flow through the system. Very important since a thermosiphon loop relies solely on temperature to create and maintain water movement.
As I mentioned above, I used galvanized pipe the first time I plumbed our system. However, it had a tendency to clog up with a brownish goo. Our water in the house is filtered so I’m not sure how this goo was created but nonetheless, it was a problem. Every year or so I needed to clean out the system.. Eventually, I converted over to copper pipe and it has been trouble free ever since. Copper seems to be the best choice to plumb our system. I have 2 couplers in my copper plumbing so that if I need to remove the water tank, it is an easy job of disconnecting the couplers and the tank is free.
Let’s take a look at our thermosiphon set up. You will note a number of things in the picture. The cold water inlet to the tank and the hot water outlet each have a shut off valve. That way, I can shut the hot water off in the house if need be or prevent cold water from going into the tank.

Hot water Tank Plumbed to Wood Cook Stove
I also have a valve on the tank outlet going to the stove’s water jacket. There are a number of very important points I’ll make. As with any hot water or potential steam arrangement, safety is paramount. It is critical that this valve remain fully open under normal circumstances. Tag it, tape it open or put a small wire tie on it so that it can’t be inadvertently shut off. But, I want that valve there so that if my stove jacket or plumbing happens to spring a leak, I have a way to shut down the tank outlet and prevent the tank’s contents from draining on to the floor. We did have a situation where the water jacket developed a leak and that valve came in handy.
Here’s what happened. We found out the hard way that it is very important to have water in the system before making a fire in the cook stove. One winter, we had returned home from a vacation and I didn’t have a chance to get the water up and running before Johanna started a fire in the wood cook stove. Because of that, our water jacket cracked. When I did fill the tank with water, it was obvious something was amiss when water started coming out of the stove onto the floor.
Another critical component of the system is a minimum of one pressure relief valve. Two is better. If for some reason the water gets too hot, it has a place to vent and release some of that built up energy. We have a relief valve with a tube going to a bucket set underneath to catch any released hot water. To install a pressure relief valve, locate the port going directly into the tank’s side and put the pressure relief valve there.

Hot Water Tank Plumbing
Unless Johanna is canning the entire day in summer or cooking the Thanksgiving turkey, rarely do we ever get water hot enough to open that pressure relief valve. We have enough experience to know when the system is building too much hot water and we just open a tap and let hot water run down the drain. It’s a balance between the tank capacity, the amount of hot water taken out of the system on a daily basis and the duration and intensity of the wood fire. Only experience over time will tell you whether you need to modify your tank size.
3 Final Points
The last 3 points I’d like to make are:
Make sure the water tank/boiler is higher than the bottom port of your stove’s water jacket. The idea is that you want the cold water in the tank to fall out of the bottom pipe and into the water jacket. If for example, you had the tank lower than the water jacket, you would be asking the water to flow uphill into the water jacket. Our tank’s bottom port is 16 inches above the bottom port of the water jacket and it works just fine.
The next point is you’ll notice I have a pressure gauge on the top of the tank on the cold water inlet. Although I have a pressure gauge downstairs in the root cellar near the water pump, this is a more convenient way for me to monitor with a quick glance, the status of our water system and pressure.
And finally, take note of the drain valve and nearby fire hose. The drain valve is handy for draining the tank for cleaning or if we go away for an extended period. The fire hose serves two purposes. I can run the hose outdoors to facilitate easier tank draining. And if the unthinkable were to happen, and the house catches fire, if we act fast, it might be possible to save the place by spraying the contents of the tank on the fire with the fire hose. No fire department will be coming to our aid so it is our responsibility to think ahead and give ourselves a chance. Please consider placing a fire extinguisher handy to your wood stoves too.
Until next time, keep the dream alive! We wish you a great day!
Ron and Johanna
If you found our site and this post of value, would you please click the “Top Prepper Sites” link in the right hand column to vote for us. Thank you so much!
Please subscribe to our blog if you would like email notification of new posts.

Hi Ron, question for you, were you able to get home insurance? If so, was it considerably more being in the location you are?
Hello Dawn. No problem on getting house insurance. I have nothing to compare to as far as rates. I can tell you it was more expensive for us based on the fact we heat and cook with wood with no other backup. In hindsight, it probably would have paid for itself multiple times over the years if we had installed a simple propane or oil based energy efficient vented heater purely as a backup to make the insurance company happy.
I’ve installed a bunch of those stoves in exploration camps but I can’t remember the brand. I’m pretty sure they were plugged in and were thermostat controlled. Here is the idea. I’m sure there are a number of manufacturers. http://www.portablespaceheater.ca/en/products/toyotomi-om-23-oil-miser.html
Thanks Ron
Pingback: Spring 2018 Update On Our Off Grid Homestead - Off Grid and Free: My Path to the Wilderness
Pingback: The Off-Grid Dream - the Realities - Off Grid and Free: My Path to the WildernessOff Grid and Free: My Path to the Wilderness
Great stuff. Could you please add a precise schematic to show how the water gets from the inlet, through the jacket, and to the tank inlet, and whether there is a “loop”, or if it is just the heat that gets sucked up the pipe into the tank, not the water. Some people add a loop.
Also, Hydrosolar.ca make great buffer tanks for these situations.
https://hydrosolar.ca/products/all-in-one-buffer-tank-and-indirect-water-heater-200-l
Thanks
Hi Ben,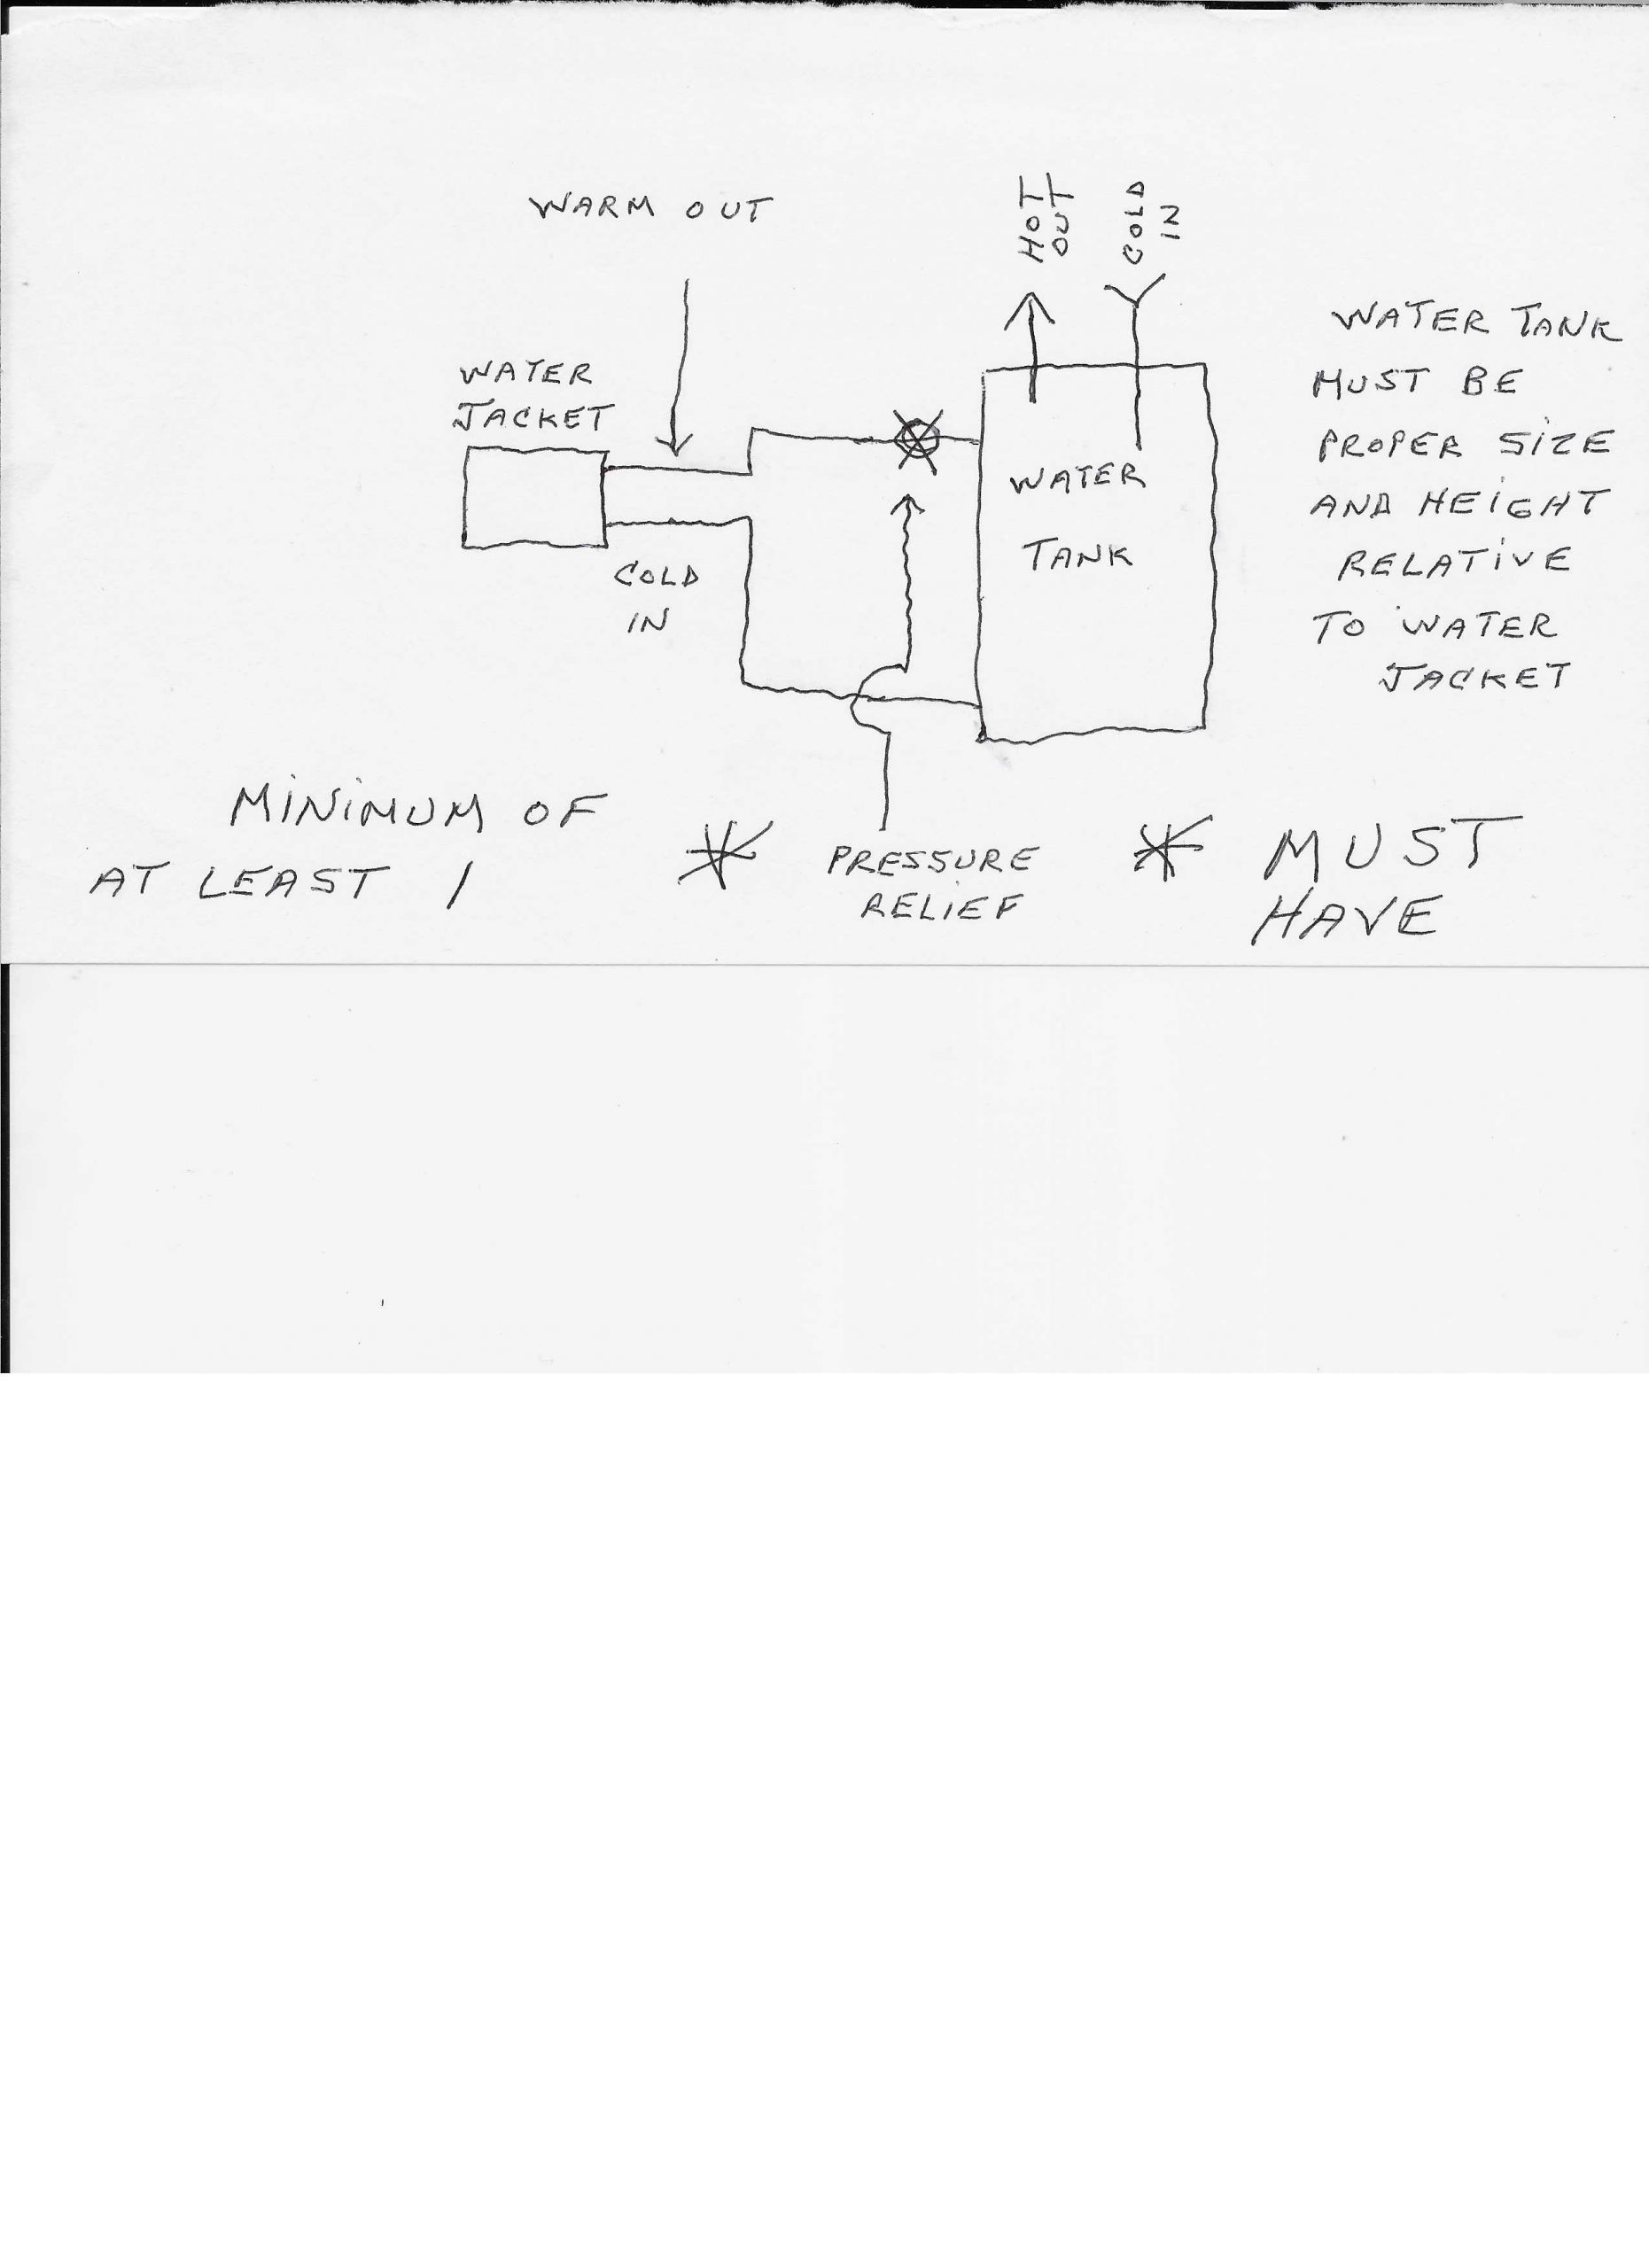
I’m sorry for the tardy response. For some reason, word press is no longer sending me a notification email. The only way I know someone commented is when I log in which I only do a couple times a week. Thanks for stopping by and asking a few questions and adding some good input as well. The tank you linked is very interesting and I wish I had known about this product a few years ago when I was setting this system back up again. I would have very much liked to have talked to these people and perhaps tested a tank. I’ve drawn a quick sketch of the plumbing. It is indeed a loop of cold/hot water circulating through the tank. In other words, our tank has 4 ports. Minimum 3/4 but I’d love to have them 1″. Cold in, Hot out, drain port and pressure relief port. The loop utilizes the pressure relief and drain ports to circulate water through the tank. And as you note, one can certainly use excess solar/wind power to dump to a load. The thing is, these tanks are so well insulated, cooking dinner once a day on the stove gives plenty of hot water for that night and the next day. Proper sizing to stove capacity ( how many BTU or log capacity), stove utilization (how often it’s used) and water demand will dictate how big a water tank one needs. Let me know if you have other questions. Be safe!
Ron this is the best example I have seen. One question though is what happens if the fire get too hot and you start to feed steam into the water tank?
Hello Paul, Thanks for the kind comment. You should never get to the steam point. That is why the system has a mandatory pressure relief valve, preferably 2 of them. One of those pressure relief valves should be close to the outlet of the water jacket. That pressure relief valve will protect the system and if it opens, cold water comes into the system to replace the water lost from the pressure relief.
Having said all that, we do not want to see things get so hot the pressure relief opens. That’s where experience comes in. We know when the stove has been cooking hot for some period of time and we simply pre-emptively run some hot water down the drain. Or spend extra time luxuriating in the shower at night, especially in winter when the stove is going more.
For us, our water system is closed. What I mean is, we have a machine dug well out front that we draw water to the house. We use that water and then all water is disbursed back into the ground through a gray water system. So it’s not like we are wasting water or paying for water that goes down the drain back into the ground. Good question. Stay well.
Also, you can add a 12V 600W electric heater element straight from a dump load controller on your wind or solar PV, and have lots of hot water in summer when you aren’t running the stove as much. A 50 gallon tank makes a great dump load for wind. cheers
Dear R and J,
Although I made the attached chart to calculate tank size, Off Grid Calc – Solar & HW .xlsx
I tend to size my tank “as big as will fit”, as it is most forgiving for the customers as their usage may evolve over time, and I’m into “bombproof” and Zero Maintenance. I just did a 50 gallon tank, which hovers between showers around 60C naturally with no tweaking.
One could always add an Aquastat, set to circulate the tank hot water through a radiant floor grid, say, to “cool it down” at an 80C set point, but a big tank seems to absorb the heat.
I also route my domestic hot water lines first through the floors. When running a bath, line heat loss is not measurable, but the heat sits there when not running, adding comfort. Hot water is my favourite way of moving heat from a stove to where it is needed. Exterior floors of course have to be properly insulated to Passiv Haus standards.
I love the “elegance” of radiant floor heat through domestic hot water lines. No pumps, no thermostats. Truly “efficient”. Radiant floor heat is “deluxe”, and very forgiving. In the City, I run it at 90 degrees F, but off grid, I just take what it offers. The floors become a “heat battery”. They don’t get “hot”, but the homeowners get happy.
Fun chatting! cheers, Ben
/Users/benbarclay/Documents/Ben’s Documents/Ben/Work/Off Grid Calc – Solar & HW .xlsx
Not sure if the actual Excel file is attaching, or how to attach it.
Good stuff Ben. I fully agree with bigger is better regarding tank size. We use our stove daily and have about a 55 gallon tank which is well matched for our daily usage. We really wouldn’t have that much excess heat to bleed off but someone could certainly do cool things like you suggest for radiant heat whether in the floor or ship it out to an attached greenhouse for example. Your excel sheet did not attach. I’m not sure how one would attach something like that in a wordpress comment but I thank you for trying. This has been a great exchange. Where are you located and what is your company? Take care!
I have used a thermosiphon for decades–copper coil in a Papa Bear Fisher stove–but now I have a different dwelling and a different heater. It’s also an older Fisher that I got used that came with a small plumbed-in box in the fire box. I tried it out for the first time last spring for a few weeks, but didn’t have a lot of success with the water heating. The stove is a little large for our place so it runs slowly most of the time, but I wasn’t sure the water was circulating right. It seems like it would be difficult to get all the air out of the box and maybe that’s important for the thermosiphon to operate. But I have seen what was called a side-arm heater that was in an old wood cook stove and it looked like it would have been difficult to get all the air out of that too. What do you think about air remaining in pockets of the system?
Sorry Ed. For some reason WordPress doesn’t give me notices anymore. Just found your comment.
The stove we’ve used for the last 25 years has the water jacket inside the firebox just like you describe. We’ve never had an air pocket problem. I think it’s important to know where your tank height is relative to the water jacket. You want the output of the water tank to be higher than the inlet of the water jacket so that the water literally runs down into the water jacket. I don’t know how there could be an air pocket if that is the set up. Can you confirm that the tank outlet is higher than the water jacket input? What is the vertical distance between tank output and water jacket in? Can you confirm you are pushing water into the bottom port of the water jacket? And what is the horizontal distance between stove and water tank?
Hello. My previous system with the copper coil in the firebox had the storage tank outlet lower than the coil and the storage tank inlet higher, and that always worked. This new system leaves the storage tank at 11 inches off the floor, enters the stove/jacket at 25 inches, leaves the stove at 26 inches and enters the storage tank at 51 inches. The box inside of the fire box is at a little slant from which the water returns to the storage tank, but there is still room for air to be trapped at the upper corner of the box inside the heater. The flow from the storage tank until it re-enters the storage tank is continuously upward–which I was told was important by a person familiar with the old-style side-arm heaters.
I should say that I did have some success in making hot water with the wood heater since I posted here. It seems slower than my copper coil set-up, but maybe that’s to be expected. I compare the temps of the storage tank outlet with the inlet to see how well it’s working. I was never able to feel the outlet pipe get warm at all, while the inlet pipe got quite hot. I have misplaced my laser temp sensor so I can’t be more exact about the temps.
This same storage system is also hooked to a couple of solar hot water panels on the roof. They operate with a little PV-controlled pump that circulates water, and that system seems to heat up much quicker. At least the outlet and the inlet temps both get hot.
Thanks for the feedback Ed. In my head, I would want the inlet of my stove jacket to be fed by a port higher than it. You are asking water to flow uphill which is fine if you have pressure behind. Speaking of pressure, keep in mind the higher your tank relative to that stove jacket inlet, the more pressure you have. I’d certainly consider raising my tank higher than the jacket input so cold water is flowing downhill into the water jacket. Two other pieces of the puzzle are how big a tank and what size lines running from tank to stove? I’m assuming pretty large storage and minimum 3/4 line? What is the pipe material? Copper runs or galvanized pipe? I found over time the galvanized clogged us. Copper did not. Obviously very important for free flow of water with little restriction. Good luck!
1/2 inch copper everywhere, 50 gal tank. We used to run a family (parents and 3
teenagers) with the 1/2 inch copper and an 80 gal tank–both with the wood
heater/copper coil (winter) and the solar hot water panels (summer). The copper coil inside the wood heater was the weak link–eventually it would leak and that was usually a disaster–but it was great for heat transfer. The black box inside my current heater will probably last longer, but the heat transfer is reduced mostly due to surface area.
I have seen systems like yours with the storage above the heat source.
When you have a closed loop like the thermosyphon I think the elevation
effect on flow is minimal. I think that the temperature gradient is more
important for the flow. If it works then it’s all good. I’m still concerned about the air trapped in the box and it’s effect on the flow.
There’s no way that we can quantify what effect elevation has versus temperature differential. I think to a degree, they work hand in hand with each other. Something needs to provide the impetus to get the water flowing. Once the water is moving, all is well. It might take minimal temperature differential with some height pressure to provide the impetus to get water moving. I think the only way to solve the poor performance is to do some experimenting. If you can, raise the tank and see what happens. Or it might be as simple as you are comparing your old system to the new and the new is working just fine but not as well as the old system. If your surface area being heated in the box is less than the original, I don’t see how it could heat as well as the old system with lots of copper which as you note is great for heat transfer and less surface area exposed to the fire. With temperatures getting cooler outdoors, you may just have to burn a longer fire to heat the water to a good temperature. I wish you the best Ed!
I agree. I think our new place is smaller and better insulated and has some passive solar, and it’s easy to get heated out of the house in mild weather. A smaller heater would be better, but this one has some artistic value. We are getting some hot water circulation–enough for the two of us when there is a small fire. This is an interesting discussion and I have enjoyed it. Thank you Ron and Johanna.
You are more than welcome Ed. Always happy to bounce ideas around. Thanks for the chat as well. Stay safe!
Pingback: Consider a Wood Burning Cookstove for Your Off-Grid Kitchen - Off Grid and Free: My Path to the WildernessOff Grid and Free: My Path to the Wilderness
Pingback: Wood Cookstoves - Tips and Tricks - Off Grid and Free: My Path to the WildernessOff Grid and Free: My Path to the Wilderness
Would it at all be possible to have a set up where the tank was below the stove?
Like stock tank on ground and coil inside first section of stove pipe coming up out of the stove.
Hi Tim. Thanks for dropping by with a question. In our setup, we are using gravity and temperature differential to move water through the system. Any tank below stove level is asking for water to flow uphill. I don’t see how it would be possible without a pump to push the water through the system. That pump would require power. This is my opinion only and someone may have found a work around. I have my doubts. My safety concern is what happens if the pump dies or power goes out. Depending on how hot the water gets, it would be critical to have at least one and preferably 2 pressure relief valves in the system. One of those pressure relief valves should be close to where the tubing or outlet is coming from the stove. Good luck!
I have an external water heater on my wood stove piped to a 40 gallon hw tank upstairs ( no electricity connected). I found it better to take the input to my heater from halfway up the tank (utilizing the electric heating element portal. This way, when I turn on the hot water tap, cold water is not delivered to the heater intake resulting in Luke warm water being delivered to the top of the tank. I still have the option of taking it from the bottom of the tank in very cold weather when the wood stove is going full out.
Dave
Hello Dave, Thanks for reaching out. If you have a system that works for you, then good job. We’ve never had a problem with luke warm water. As far as I’m concerned, one should never have the problem that you describe. There’s a column of water in the tank with the hottest water at the top. If the water tank volume is matched with stove heat output matched with water usage, the water temp in that entire tank is going to be pretty hot and uniform, especially if water is not taken out for a spell.
Although I’ve never taken a water tank apart, my understanding is the cold water inlet feeds the very bottom of the tank. So as cold water enters, it doesn’t really mix. It just lifts the column of hot water as cold water comes in. So in other words, with our 55 gallon water heater tank, we could shower for half an hour and have nothing but hot water. We might need to slightly tweak the faucet control a little over time. But every few minutes of that shower, our water pump will come on to supply cold water to the tank and never have we noticed any temperature change when that occurs. The water temp just stays consistently good. We would need to run the hot water for a long time before getting down to luke warm water. Stay well!
I currently have a system with a stand alone firebox (not connected to the house heating fire). The hot water tank has a temperature gauge on it. I heat the water up to about 60degC then put the fire out. I would like to plumb it up to the house heating fire but I’m worried the water in the tank will get too hot if the fire is burning for long periods. Is there a way to control the temperature in the tank without relying on electronics or bleeding off hot water?
Hello Max. Not that I’m aware of. I can’t imagine there would be a way without mechanical/electronic intervention. The stove has variable heat output depending on amount of wood and how hot you make the fire and it really comes down to balancing heat output, water tank size and general use of hot water to regulate the water temperature. In a sense, your system is just a pot of water sitting on the stove top. You heat the water up to a certain temperature and then take the pot off the stove for later use. At least on the stove top, you could move the pot of water around off to the side for some temperature control. Thanks for the question.
Thankyou Ron for the detailed explanation.
I currently have a mains pressure electric HWS. I have 16kW of Solar and 33kW of battery.
In summer all is good but in winter it’s a different story of course.
I want to be less reliant on the grid (we are connected but don’t use grid power, it’s there for emergencies) hence my battery, but don’t want to be tied solely to using 3.6kW for heating water.
So my plan is to use a 20mm copper coil in a fire and connect it to the spare ports on the HWS.
BTW I’m in Australia and it doesn’t get too cold where I am, perhaps 4 (degrees c) at night and 12 during the day.
Anyway thankyou again for sharing your thoughts and experience.
You are more than welcome Paul. 16kW is a big system. I have no experience with copper coil in a fire but I know that was a way to do it. Sounds like you have a good handle on it but I throw the following thought out for anybody following along.
There is still a balancing act between the mass of water being heated and the surface area of the copper coil. In other words… a single loop of copper is going to have very different heating characteristics versus 10 loops of coil in the fire. If the volume of water is the same between the 2 coil options, the water should heat up faster with the multiple loop coils. (Seems logical to me) I would still want a pressure relief valve in the system minimum. So number of coils versus size of water reservoir being heated still needs to be figured out. Good luck.
There is an interesting solar water heating system that takes solar heated water and pumps it down from roof to a heat exchanger that is connected into a thermo syphon loop in a water heater tank. At one time you could contact the inventor of the Bubble Action Pump (which is related to the old coffee percolator) but operates with a permanent loop of antifreeze water circulating in the solar heater panels. As a tiny child I watched my father fill the hot water tank with a bucket into a special pipe with ordinarily a tight cap to bring the water into the coal/wood cooking range heating jacket and heater in our small mountain home during the winter visits. I remember the pipe going to the water jacket from near the bottom of the tank as well as the pipe going to the side near the top of the tank from the jacket. The water inlet was a copper pipe inserted into a one inch then standard top of the tank fitting and extended to near bottom. (I replaced the failed plastic tube of our gas water heater with a half inch galvanized steel pipe) I still have the copper water inlet pipe and it’s tank fitting and the tank taken out with stove when house was sold out of use. I had fitted the water adding side opening earlier with a one inch screw in heavy duty electrical hot water tank heater when the cooking range was not needed often any more after we got better electrical service. Later a small electric heater was installed above the kitchen for dish washing on short visits. There were standard stands for the tanks and that one was lost. The range was used for years later in distant town until the new owner could no longer carry coal or wood. The thermo syphon can operate even if the pipe from tank comes from lower than water jacket but of course the tank must be filled to be above the water jacket always with fire. Of course water jackets could be made to withstand dry heating. The Ranch we owned with partners had a cookhouse with wood fired Range and eventually the burnt down main house was built with one and both had water jackets and water tanks. A shower and laundry house was eventually built with a laundry stove with water jacket surrounding the fire for thermo syphon heated tank and I split much wood for these fires. This was on Sacajawea’s traditional bison hunting range that they were driven from by the Sioux who kidnapped her. Cattle naturally had some success there too.
Heat exchangers are now made in massive numbers. The thermo syphon effect can be used in strange ways. The bubble action pump has made uncountable cups of coffee and can put heat even under ground or heat a basement or tornado shelter or even swimming pools with thermal solar panels. The idea of heat pipes ought to be included for off grid heating. A simple heat pipe is a vertical or sloped pipe sealed perfectly at both ends and contains only water or an antifreeze solution of water and no air at all only a vacuum filled with the liquid vapor. The liquid boils in the lower end and heats the top end by condensing back into liquid and flowing back to fire end. Germany had baking ovens heated this way in a separate room from the fire in the early 1900s. More complicated heat pipes with special internal structures were invented by the space program and are now used in almost every computer. They can take heat horizontally or up very well but only down a short distance.
The people who live off the grid have an interesting not very new development called the Rocket Stove Mass Heater. It is not easily understood because it is totally related to the thermo syphon effect but with air and smoke. There is the Dakota fire hole invented by natives that is a vertical hole dug into the ground and then joined by a slanted hole started a distance away. A fire is built at the bottom of the vertical hole protected from breezes, and air to the fire is sucked in from sloped hole by the hot air rising. The ordinary fire place is a relative. The so called
plain rocket stove is just a miniature fire place where cooking is done on top of chimney and air is pulled into fire by the air thermo syphon effect.
An ordinary fireplace and chimney is a thermo syphon that circulated air in buildings. An old house construction book describes ventilation of a closet with a chimney going outside with a gas flame at bottom.
You can buy the charcoal lighting tube to buy your own thermo syphon.
As a child I failed at recognizing the necessity of the thermo syphon by not having a glass chimney for a kerosene lantern.
Hello Robert. Thanks for your comments. It proves there are many ways of doing things. The only thing I’d like to really respond to is your comment “Of course water jackets could be made to withstand dry heating”.
Perhaps but we cracked a water jacket 100 miles in the wilderness with no means for a replacement. We lost our ability to heat water. We reverted to shower bag and heating water on the stove in pots for months. Not good. I would suggest regardless, nobody take a chance on firing up their stove without water in the water jacket or one risks cracking it. Our water jacket was stainless steel. To this day, I have a spare water jacket. We will never have a disaster like that again. The only way we knew it was leaking was when we got the water pump running and water was leaking out the stove onto the floor. Stay well!
Hey Ron, thankyou again. Yep I’ll have a PTR on the tank.
I have a few projects on the go but I’ll keep you informed.
Cheers
Paul